A custom graphical front-end for Juniper SSL VPN, specifically for Ubuntu. This tool is just a Java Swing based GUI front end to Juniper Network's provided Network Connect tool. It sits nicely in your system tray until you need it :) I have only tested this on Ubuntu 15.04 x64 connecting to a VPN that uses 2 factor authentication.
Juniper Networks provides a tool for connecting to their SSL VPN networks. The problem lies in that you need a DSID before you can use it. You can get that by logging into the VPN's web site. Unfortunately, it's provided to you as a cookie, so it's still not as easy as just copying and pasting it from the website to the terminal. This tool basically emulates a browser to do the login for you, where it is able to access the DSID. Once it has logged you in, it launches and manages network connect.
I found a few python scripts that do this for you, but they weren't exactly what I was looking for.
- Go to your VPN site and log in using your credentials at
https://<your-vpn-server> - Download the JAR - it's hosted by your VPN at
https://<your-vpn-server>/dana-cached/nc/ncLinuxApp.jar mkdir -p ~/.juniper_networks/network_connect- Move
ncLinuxApp.jarto the folder you just created.mv ~/Downloads/ncLinuxApp.jar ~/.juniper_networks/network_connect cd ~/.juniper_networks/network_connectjar -xf ncLinuxApp.jarwhich will extract the contents of the jar file.sudo apt-get install gcc-multilib libc6-i386 libc6-dev-i386will install the required 32-bit library dependencies.gcc -m32 -Wl,-rpath,`pwd` -o ncui libncui.sowhich will buildncuiecho | openssl s_client -connect your.vpn.website:443 2>&1 | sed -ne '/-BEGIN CERTIFICATE-/,/-END CERTIFICATE-/p' | openssl x509 -outform der > ssl.crtwill fetch your vpn's web certificate put it into a file called ssl.crt.sudo chmod +x ncui ncsvcwill make sure thatncuiandncsvcare executable
- You will need Git, Java 8 and Maven installed.
- Clone this repository
cd juniper-connectermvn clean installcp ./target/juniper-connecter-0.0.1-SNAPSHOT-jar-with-dependencies.jar ~/.juniper_networks
java -jar ~/.juniper_networks/juniper-connecter.jar- You should see a new icon appear in your system tray
 3. Right click on it and select "Settings"
4. A dialog box will appear. Enter your VPN url (without the https prefix)
3. Right click on it and select "Settings"
4. A dialog box will appear. Enter your VPN url (without the https prefix)
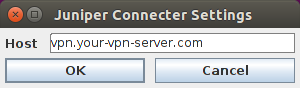 5. Press "OK"
6. Right click on the system dialog again and select "Connect".
7. You'll see a transient dialog box telling you that it's trying to reach your VPN server, then you'll see a connect dialog box asking you for your credentials
5. Press "OK"
6. Right click on the system dialog again and select "Connect".
7. You'll see a transient dialog box telling you that it's trying to reach your VPN server, then you'll see a connect dialog box asking you for your credentials
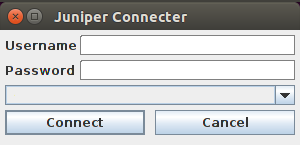 8. Fill them in and press "OK"
9. You should then be asked for your OTP if the server wants one. Fill it in.
10. You'll then be asked for your admin password, which is needed to launch
8. Fill them in and press "OK"
9. You should then be asked for your OTP if the server wants one. Fill it in.
10. You'll then be asked for your admin password, which is needed to launch ncsvc and ncui.
11. Once you're connected, the icon in the system tray should change to include two little arrows to indicate you are connected. The arraow will be visible as long as you are connected.
 12. To disconnect, right click on the icon and select "Disconnect"
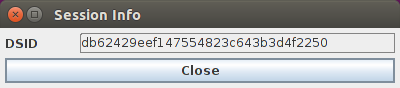
If the arrows appear and then disappear, then it is most likely a problem with ncsvc and ncui. You can use get the DSID from the system tray and manually test Network Connect. To do this, right click on the system tray icon and select "Session Info". This option will only be available after logging in at least once.
Exit Juniper Connecter. We don't want it running ncsvc in the background.
ps aux | egrep "(ncui|ncsvc)"and make sure they're not running.kill <process-id>if they are.cd ~/.juniper_networks/network_connectsudo ./ncsvcwill startncsvc, which needs to run in the background../ncui -h <host> -c DSID=<dsid> -f ./ssl.crt
Replace with your VPN host - without the https prefix
Replace with the token you got from the Session Info dialog
It should stay up and you should see a tun0 device when you run ifconfig