1.2.3 The Story Detail
Welcome to the story detail page. Story detail pages let you and the rest of your stori.es community read and share the personal stories submitted by storytellers to effect change!
You can also perform actions that help you curate your stories, for example adding a tag or note to an individual story, or adding the story to a new collection.
This page is also where you can edit submitted stories, as necessary.
Below, we'll explore the elements of this page and how to use them.
Elements of the Story Detail

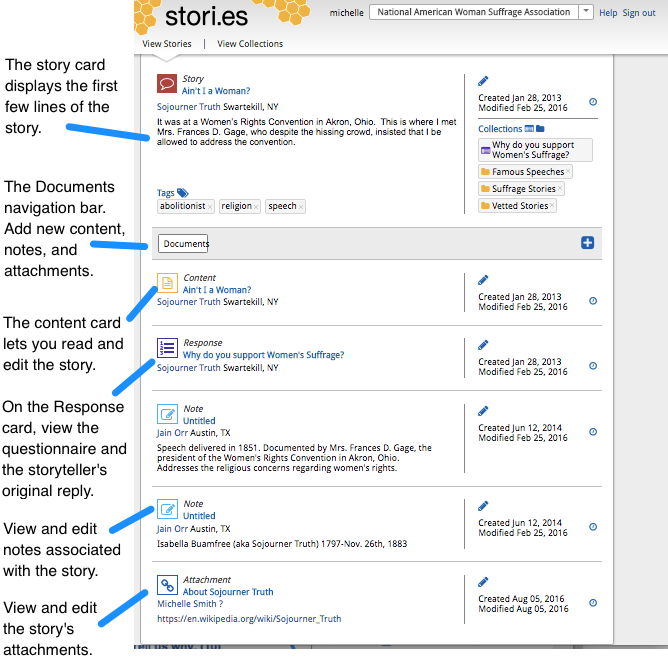
An abbreviated version of the story, called the story card, appears at the top of the story detail. Tip: Click on the story title to close the story detail view and return to View Stories.

The  (blue plus icon) on the Documents navigation bar lets you add new content, a new note or a new attachment to the story.
To add a new document to the story detail:
-
Click the
and select the type of document you want to add - Content, Note, or Attachment. Tip: If the current story already includes a Content document, this option is disabled. -
Select Add Content to open an editable content card window. Type in a title for the content. Type the content itself in the Summary text box. Click Create to publish the new content. It appears on the bottom of the story detail.
Select Add Note to open an editable note card window. Type in a title for the note. Type the note itself in the Summary text box. Click Create to publish the new note card. It appears on the bottom of the story detail.
Select Add Attachment to open an editable attachment card window. Type in a title for the attachment. In the URL field, paste or type the URL you want to link to. Note that the attachment must have a web address (URL). Click Create to publish the new attachment. It appears on the bottom of the story detail.
Tip: Cancel closes the new content, note, or attachment card window without saving or publishing the new document.

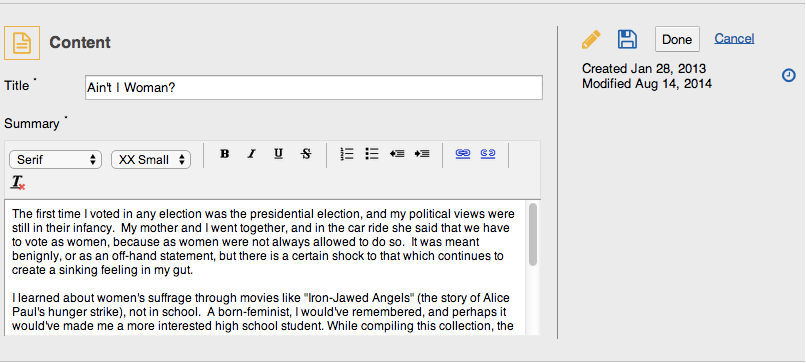
View and edit the most recent version of the story title, summary and content. You can also add media to the story. Tip: To view the storyteller's original response to the story ask as well as answers to any custom questions on the questionnaire, open the Response card.
By default, the Content Card displays in summary mode. The story's Created/Modified information is displayed on the right side of the card. The Edit icon (the pencil) on the right side of the card lets you make changes to the story content:
- Click the Edit icon. The edit window opens. The Title and Summary fields are now in edit mode. You can enter the changes you'd like to make.
- The yellow pencil icon (
 ) lets you know the card is in edit mode.
The Save icon ( ) lets you save your changes without closing the edit mode of the content card.
Click Done to save your changes and close the edit window.
Cancel closes the edit window without saving any changes.
To view and edit the most recent version of the story, click the story title on the Content Card:  .
.
The story content displays in an editable content block. You see a pencil icon on the left edge of the block. Clicking the pencil lets you make changes to the block. To return to the card's summary view, click the story title.
You can add media to Content Cards! To add media (text, images, and audio and video clips) and embed documents, stories or entire collections:
-
Click the story title to access the editable content block:
-
Access the menu block by clicking the + (plus sign) that appears after each block:

-
Select and edit the content block(s) you want to include on the confirmation page.

The Response card displays the title of the questionnaire used to submit the story and lets you view the original story submitted by the storyteller as well as the questionnaire used to collect the story. The Response card is also where you can view storytellers' answers to custom questions. See the questionnaire's Created/Modified information on the right side on the card.
Click the questionnaire title to view the questionnaire and the storyteller's complete response, as originally submitted.

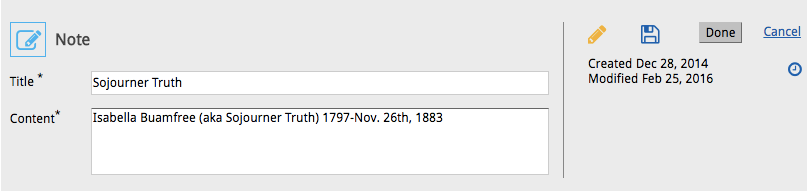
Notes cards let you view and edit any notes your organization has associated with the story. The name of the person who created the note is displayed. You can click on the name to go to the person's detail page. The note's Created/Modified information also appears on the card.
About Notes. Notes are viewable by anyone in your organization with access to stori.es but are not visible to storytellers. Currently, once a note is added to a story, it can be edited but not deleted.
To edit the note:
- Click the Edit icon. The edit window opens. The Title and Content fields are now in edit mode. You can enter the changes you'd like to make.
- The yellow pencil icon () lets you know the card is in edit mode.
The Save icon () lets you save your changes without closing the edit mode of the note card.
Click Done to save your changes and close the edit window.
Cancel closes the edit window without saving any changes.

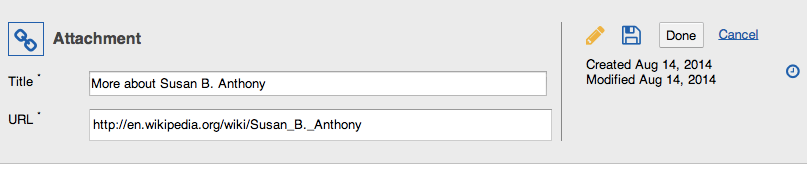
The attachment card lets you link to a URL associated with the story, and edit the link. You can see who added the attachment and click the name to view the person's detail page. The attachment's Created/Modified information also appears on the card.
To edit the attachment:
- Click the Edit icon. The edit window opens. The Title and URL fields are now in edit mode. You can enter the changes you'd like to make. Note that the attachment must have a valid web address (URL).
- The yellow pencil icon () lets you know the card is in edit mode.
The Save icon () lets you save your changes without closing the edit mode of the note card.
Click Done to save your changes and close the edit window.
Cancel closes the edit window without saving any changes.